
Garbage disposal humming but not spinning: how to free a jammed flywheel
A garbage disposal that hums or buzzes but will not turn has power reaching the motor and a mechanically jammed flywheel — a completely different problem from a silent, dead unit. The hum is the motor straining against a grinding plate that something has locked in place, and the fix is to manually rotate the flywheel free. This guide covers that fix in the safe order: cut the power first and never reach into the chamber by hand, turn the flywheel with a 1/4-inch hex (Allen) wrench in the hex hole on the bottom of the unit, work it both directions until it spins freely, remove the offending debris with tongs, then press the reset button. It also covers which foods and objects jam disposals, why the thermal-overload protector keeps a humming unit from burning itself out, and when a worn shredder ring means the unit needs replacement rather than another unjamming. The CPSC's 2017 recall of disposals that could activate unexpectedly is the reason the power comes off before anything else.
Last reviewed: 2026-06-04
Why is my garbage disposal humming but not spinning?
A humming garbage disposal has power reaching the motor but a flywheel that something has mechanically jammed, so the motor strains against a locked grinding plate instead of turning it.
The hum itself is the diagnosis. When you flip the switch and the disposal buzzes or hums but the grinding plate does not turn, electricity is reaching the motor normally — the unit is not dead — but the flywheel, the rotating plate that flings food against the shredder ring, is locked by something wedged between it and the ring. The motor energizes, strains against the obstruction, and produces the hum without rotating, which is the unmistakable signature of a jam rather than a power loss.
This is the opposite case from a silent disposal. A unit that makes no sound at all has lost power and needs the reset-GFCI-breaker-outlet chain in our guide on a garbage disposal that will not work at all. A humming unit has confirmed power by definition, so chasing breakers and outlets on it is wasted effort — the fix is purely mechanical: free the flywheel and clear what jammed it.
What jams the flywheel is usually either a hard object that fell in — a bottle cap, a bone, a utensil — or a fibrous or starchy food that wrapped and bound the plate. The motor is strong enough to grind soft waste but not to shear through a wedged metal object or a dense fibrous mat, so it stalls and hums. Identifying that a jam, not a failure, is the cause is what makes this a homeowner-fixable problem in most cases.
Critically, a humming unit is a live unit, and the entire fix begins by cutting that power. The motor is energized and trying to turn, so any clearing work done with the power on risks the plate suddenly breaking free and spinning against your hand or tool. The next section makes the power-off rule explicit before any of the mechanical steps, and that rule is non-negotiable.
Turn off the power first — never reach in by hand
Switch the disposal off at the wall and unplug it before touching the chamber; never put a hand inside, because a jammed unit can break free and activate unexpectedly.
Before any unjamming step, kill the power completely. Turn the wall switch off, and unplug the disposal at the receptacle under the sink, or switch off its breaker if it is hard-wired. A humming disposal is energized and actively straining to turn, which is precisely the condition in which a flywheel can suddenly shear free of its obstruction and spin — and if a hand is in the chamber when that happens, the injury is severe.
This is not a theoretical caution. In 2017 the U.S. Consumer Product Safety Commission recalled a batch of garbage disposals that could activate unexpectedly, posing a laceration hazard to anyone with a hand in the unit — the documented reason the power must be dead before anyone reaches near the grinding chamber. Treat every disposal as capable of unexpected activation and remove the power source entirely rather than relying on the wall switch alone.
Never put a hand into the disposal chamber, jammed or not. The shredder ring and flywheel are sharp, and the entire point of the manual-rotation method below is that it frees the jam from outside and underneath the unit — through the hex hole on the bottom — so your hands never enter the grinding chamber. When debris does need to come out of the chamber, it comes out with tongs or pliers, never fingers.
With the power confirmed off and unplugged, the unit is safe to work on, and the rest of this guide is mechanical: find the hex hole, turn the flywheel, clear the debris, and reset. Re-energize the unit only after the jam is cleared and your hands and tools are clear of the chamber. The discipline of power-off-first is what makes a jammed disposal a routine homeowner fix instead of an emergency-room visit.
What size Allen wrench unjams a garbage disposal?
A 1/4-inch hex (Allen) wrench fits the hole on the bottom of most disposals; many units ship with a factory hex wrench roughly four inches long stored near the unit.
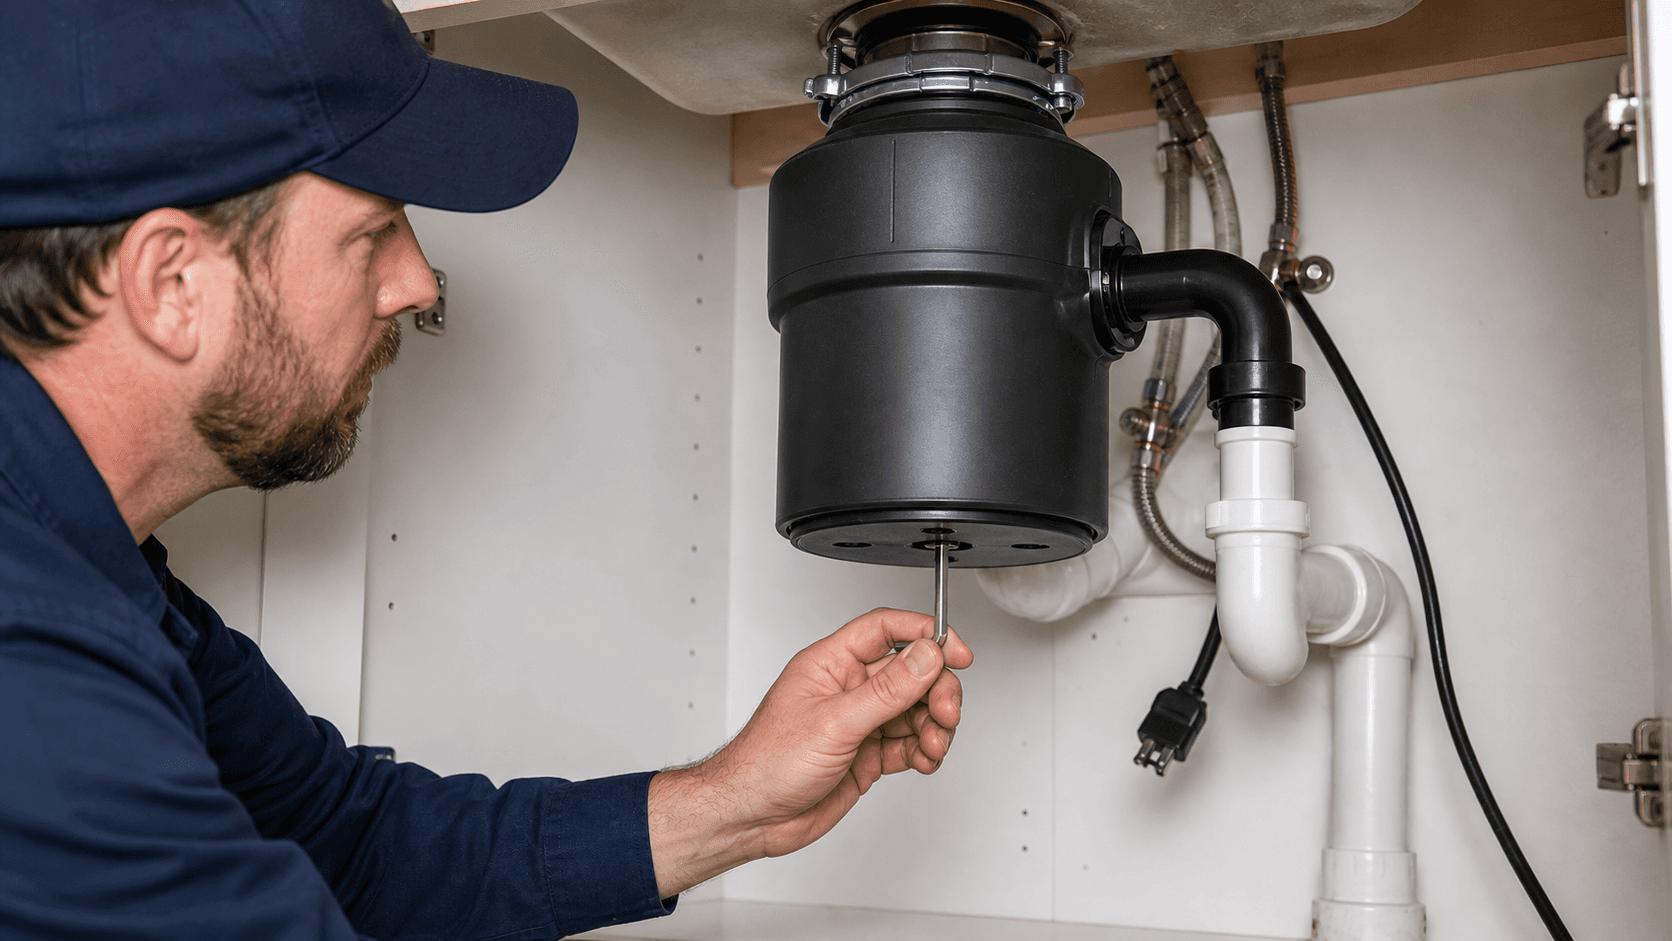
The tool for freeing a jammed flywheel is a 1/4-inch hex key, also called an Allen wrench — the same L-shaped hex tool sold in any hardware set. It fits the hex-shaped socket at the center of the disposal's underside, which connects directly to the flywheel shaft, so turning the wrench turns the plate and breaks the jam loose from outside the unit. This is the manufacturer-intended method, not a workaround.
Most disposals ship with the correct wrench included. Manufacturers such as InSinkErator supply a factory hex wrench — a short tool roughly four inches long, sometimes called a self-service or Jam-Buster wrench — often clipped to a bracket on the underside of the unit or stored in the original mounting hardware. If the original is long gone, a standard 1/4-inch Allen key from a hardware set does the identical job, which is why a misplaced factory wrench is no obstacle to the fix.
The wrench works because it engages the flywheel shaft directly. Inserting it into the bottom hex hole and rocking it back and forth rotates the locked plate, dislodging whatever wedged between the flywheel and the shredder ring. Because all of this happens from the bottom of the unit, the method keeps your hands entirely outside the grinding chamber — the safe-access principle that makes the whole procedure homeowner-appropriate once the power is off.
If the unit has no bottom hex hole at all — some designs omit it — the alternative is a manual turning tool inserted from the top to rock the plate, but most residential disposals have the bottom socket and the 1/4-inch wrench is the right answer. The next section pins down exactly where that hole is.
Where is the hex hole on a garbage disposal?
The hex hole is at the center of the bottom of the disposal, facing the floor of the cabinet, directly below the grinding chamber on the flywheel shaft.
Look at the underside of the disposal, the surface that faces down into the sink cabinet. At its center is a recessed hex-shaped socket — the hole that accepts the 1/4-inch Allen wrench. It sits on the axis of the unit, directly below the grinding chamber, because it connects straight to the flywheel shaft that the wrench is meant to turn. On most units it is the only feature at the very bottom center, so it is easy to find by feel once you know to look there.
Reaching it usually means getting down under the sink with a flashlight, since the bottom of the disposal faces the cabinet floor and the socket can be tight against the back wall on a deep install. Clear anything stored under the sink, get a light on the underside, and locate the hex socket at dead center before inserting the wrench. Seating the wrench fully in the socket matters — a partial engagement can round the hex or slip under load.
Do not confuse the hex hole with the reset button, which also lives on the underside of many disposals. The reset is a small button, usually red, that pops out when tripped; the hex hole is a recessed socket at the very center. Both are part of the bottom-of-unit service interface, and a full jam fix uses both — the hex hole to free the flywheel and the reset button to restore power afterward.
With the wrench seated in the bottom hex hole and the power confirmed off, you are ready to free the flywheel. The next section walks the turning, the debris removal, and the reset in order.
How to free a jammed flywheel, step by step
With the power off, work the 1/4-inch wrench both directions in the bottom hex hole until the flywheel spins freely, remove the debris with tongs, then press the reset and restore power.
With the power off and unplugged, insert the 1/4-inch Allen wrench into the bottom hex hole and rock it firmly back and forth — clockwise and counterclockwise both. Working it in both directions is what breaks the jam loose, since the obstruction may release more easily in one direction than the other. Keep turning until the wrench rotates a full revolution freely in both directions, which means the flywheel is no longer bound against the shredder ring.
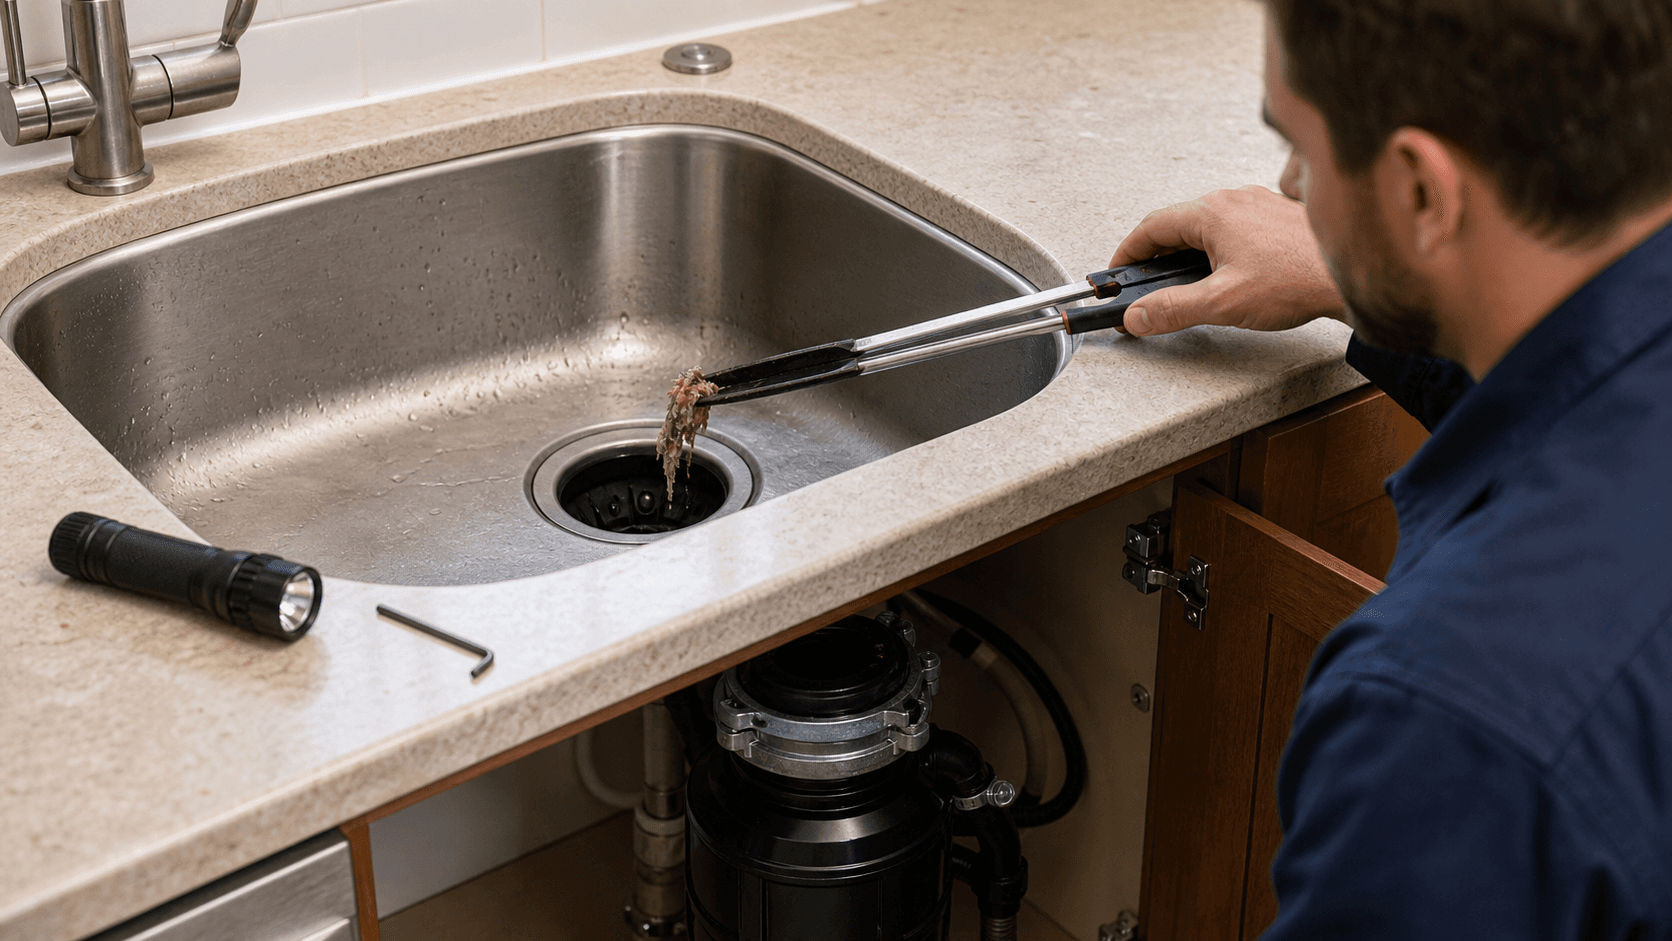
Once the flywheel turns freely, look into the chamber from the top with a flashlight and remove whatever caused the jam. Use tongs or pliers — never fingers — to fish out the bottle cap, bone, utensil, or wad of fibrous food wedged at the plate. Clearing the actual obstruction matters as much as freeing the plate, because a flywheel turned free but left full of the jamming debris will simply re-jam the moment power is restored.
With the flywheel spinning and the debris out, restore power and press the reset button on the bottom of the unit, since a jam that stalled the motor will usually have tripped the thermal-overload reset. Press it after the unjamming, not before — resetting a still-jammed unit only re-trips it. The correct order is clear the jam, then reset, which our guide on the garbage disposal reset button covers in more detail.
Finally, run cold water and flip the switch in short bursts to confirm the plate spins cleanly and grinds normally. If it now runs freely, the jam is fixed. If it hums again immediately, debris remains or the obstruction has re-wedged, so cut the power and repeat the rotation and removal. A unit that will not stay clear after a thorough unjamming, or that grinds roughly, may have a worn shredder ring — the replacement case covered below — and is a reason to book garbage disposal repair and replacement in Bellevue.
What foods jam a garbage disposal?
Fibrous foods (celery, corn husks), starchy foods that expand or paste (potato peels, pasta, rice), bones, grease, and dropped hard objects are the common jammers.
Fibrous foods are the classic jammers because their stringy fibers wrap around the flywheel and bind it rather than grinding cleanly. Celery, corn husks, onion skins, and artichoke leaves all behave this way, twisting into a mat that locks the plate. These are the foods most often blamed for a sudden hum, and they are worth keeping out of the disposal entirely in favor of the trash or compost.
Starchy foods jam through a different mechanism: they expand or turn to paste in water. Potato peels, pasta, and rice swell and form a dense, gluey mass that both clogs the chamber and binds the flywheel, and they can pack the drain below the unit as well. Because the paste forms after the food is wet, the jam can appear some time after the food went in, which makes the cause less obvious than a hard object that locks the plate instantly.
Hard items are the instant-jam group. Bones, fruit pits, and any dropped object — a bottle cap, a twist tie, a spoon, a bit of glass — wedge between the flywheel and the shredder ring and stall the motor immediately on the next start. Dropped utensils are an especially common cause, which is one more reason the power must be off before anyone reaches near the chamber to retrieve them. Grease rounds out the list: it does not jam the plate directly but congeals downstream and contributes to the buildup that backs the unit up.
Grouping the offenders this way makes prevention simple: keep fibrous and starchy foods, bones, grease, and any non-food object out of the disposal, and run plenty of cold water during and after grinding to flush what does go through. A disposal that jams repeatedly despite careful use may have a worn shredder ring rather than a feeding problem, which points toward the replacement case below.
When a humming garbage disposal needs replacement
A disposal that keeps jamming after a thorough unjamming, or grinds roughly with a worn shredder ring, is at end of life and gets replaced rather than freed again.
Most hums are a one-time jam that the wrench-and-tongs method clears for good. The replacement signal is repetition: a unit that re-jams on normal food shortly after a careful unjamming, or that grinds roughly and incompletely even when nothing is obviously wedged, has likely worn its shredder ring or impeller past the point of grinding cleanly. At that stage the jamming is a symptom of wear, not of what went down the drain, and freeing it again only buys a little time.
Age frames the call. Garbage disposals last about 10 to 12 years, so a unit near or past that mark that has started jamming chronically has reached normal end of life, and replacing it is sounder than repeatedly unjamming a worn appliance. A young unit that jams once on a bone is just jammed; an old unit that jams every week is wearing out.
Replacement cost is documented nationally rather than locally: HomeAdvisor reports garbage disposal replacement at roughly $150 to $950, averaging around $550, with labor in the $80-to-$200 range. The figure depends on the horsepower and grade of the new unit and on whether the existing mount and wiring need correcting. A straightforward like-for-like swap on an existing mount sits toward the lower end of that range.
If repeated unjamming is not holding, or the grind has gone rough, that is the point to replace rather than free it once more — book garbage disposal repair and replacement in Bellevue. If instead the unit has gone fully silent rather than humming, it is a power problem, not a jam, and our guide on a garbage disposal that will not work at all walks that diagnosis.
Common questions about a humming garbage disposal
No, a brief hum will not burn out the motor — a thermal-overload protector trips first and cuts power. And press the reset after unjamming, never before.
No, a humming disposal does not usually burn its motor out, because a thermal-overload protector intervenes first. When the motor stalls against a jam and overheats, the thermal-overload reset trips and cuts power to the unit, which is why a jammed disposal so often goes silent after humming for a moment. That built-in protection is what gives you time to free the jam safely, but it depends on you cutting the wall switch promptly rather than holding the switch on against a humming, stalled motor for an extended period.
Press the reset button after unjamming, not before. A jam that stalls the motor trips the thermal-overload reset, but pressing that reset while the flywheel is still locked simply re-trips it, because the underlying stall is still there. The correct order is to cut the power, free the flywheel with the wrench, remove the debris, and only then restore power and press the reset — at which point the now-free motor runs normally. Resetting first is the most common mistake on a jammed unit, and our guide on the garbage disposal reset button explains why the sequence matters.
Sources
Every fact in this guide cites a verifiable public source. If you find a number we got wrong, email dispatch@bellevueplumberpro.com.
- InSinkErator — Fixing a jammed garbage disposal
- InSinkErator — Jam-Buster self-service wrench (1/4-inch hex)
- InSinkErator — Resetting a garbage disposal
- CPSC — 2017 Anaheim/Moen garbage disposal recall (unexpected activation)
- Bob Vila — How long do garbage disposals last
- HomeAdvisor — Garbage disposal replacement cost
Need help with this in your home? See our Garbage disposal repair and replacement in Bellevue page for pricing, our diagnostic process, and how same-day service works across the Eastside.
Related services: Drain Cleaning and Clog Removal.
Related guides
